Online Study Guide
The Certification Process must be completed before access is granted to the Model Shop for class projects. The hands-on training will be conducted by the Model Shop staff and student can sign up upon passing the Safety test.
Model Shop Certification Process:
- Review the Online Study Guide in the sections below.
- Pass the Online Safety test in Canvas.
- Sign up for Hands-On training in Canvas. Several sessions per week will be available during Weeks 2-5.
- Complete Hands-On Training - Build a 4"x4"x4.75" personalized laser-etched pen holder box. It will be a 150 minutes training in groups of 10 students.
- Enter the Emergency contact information in the Model Shop database.
Failure to comply with written safety practices may result in referall to Cal Poly Pomona Judicial Affairs for Disciplinary Action.
All students are required to clean their work area which includes: putting tools back where they belong, sweeping the floor, dusting off the machines, and putting scrap wood and metal in the appropriate trash bins located throughout the model shop. A clean shop makes for a much more enjoyable and safe place to work.
The following safety guidelines apply to all Model Shop activity. Consult with the Model Shop Supervisor if you are uncertain about how to safely accomplish your goals.
- Always obtain instruction in the safe and proper operation of any tool or machine from the Model Shop Supervisor before using it for the first time, regardless of previous outside experience.
- There are many ways to achieve the results you desire. Consider alternative methods and choose the safest tool for the job.
- Do not operate any tool or machine unless the Model Shop Supervisor is present.
- Work in pairs whenever possible and always be willing to help others.
- Report any defective tools, improper use of equipment, or other unsafe conditions to the Model Shop Supervisor immediately.
- No running or horseplay is allowed in the Model Shop.
- Report any accident or personal injury, no matter how minor, to the Model Shop Supervisor immediately.
- Proper clothing and footwear must be worn when working in the Model Shop. Loose clothing must be tucked in, dangling jewelry and neckties must be removed, and long hair must be tied. Sandals or high heels are not permitted. Torn clothing is not permitted.
- Eye protection must be worn in the Model Shop at all times. Ear protection is recommended when working with loud machinery.
- Do not bring outside tools into the Model Shop.
- You may bring your own materials to work with or purchase materials from the Model Shop Supervisor. Some materials, such as particle board, wafer board, MDF (medium density fiberboard), and homosote are not allowed in the Model Shop.
- Keep your work area clean and tidy. Keep tools and materials orderly and in a safe location
- Keep any rags contaminated with oil, gas, paint, solvents, or other combustibles in a covered metal container to avoid fire. Any liquid spills should be cleaned up immediately.
- Exercise proper lifting techniques when moving heavy material or equipment. Before lifting, be sure your path is clear of obstacles. Keep your back vertical and use your legs when lifting objects from the floor. Generally, materials in excess of 30 lbs or longer than six feet should be lifted by two people.
- Clean up after yourself. Before you leave the shop, clean up any areas where you have been working and be willing to assist others with general cleanup. Begin gathering your materials fifteen minutes before the shop closes.
- Return all tools and equipment to where they belong when you are done.
- No food or drinks are allowed in the Model Shop.
- Bring your Bronco Access Card (student identification card) with you. Whenever you work in the Model Shop, you must give your student identification card to the acting shop supervisor upon request.
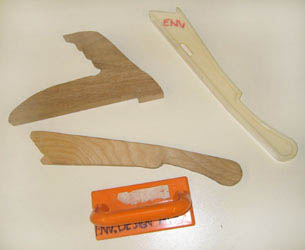
STOCK. Generic term used when referring to wood, lumber or building material.
ROUGH LUMBER. Unlike soft woods that are pre-milled to specific dimensions, hardwoods come in random lengths and widths and are bought and sold based upon rough dimensions. When purchasing stock from a mill, the buyer must specify the required nominal dimensions or choose a board that is appropriate for the application. Since rough lumber has not yet been surfaced, one must always begin with oversize material. Surfacing a board's sides removes about 1/4 inch of material from the board's thickness. The following terms are used to indicate the thickness of a rough cut board.
- 4/4 material (four quarters of an inch thick) will produce a surfaced board that is 3/4" thick.
- 5/4 material will produce a board that is 1" thick.
- 6/4 material will produce a board that is 1 1/4" thick.
- 8/4 material will produce a board that is 1 3/4" thick.
- This rule continues with 12/4, 16/4, and so on.
SURFACED LUMBER. Stock with one or more faces planed flat prior to purchase. Typically, this is the type of material you will find in a lumber yard. The following abbreviations are used to indicate which faces of a board have been surfaced.
- S & S - The board is surfaced and straight lined.
- S1S - The board has been surfaced on one side.
- S2S - The board has been surfaced on both sides.
- S3S - The board has been surfaced on both sides and one edge.
- S4S - The board has been surfaced on two sides and two edges.
DIMENSIONS OF MATERIALS.
Length - The longest dimension of the material, usually in the direction of the grain.
Width - The second longest dimension of the material, usually against the direction of the grain.
Thickness - The smallest dimension of the material.
RIP CUT. A cut made parallel to (in the same direction as) the grain of the wood. Because the grain of plywood alternates between layers, we define rip cuts as going along the length of the material, regardless of the orientation of the surface grain.
CROSS CUT. A cut made perpendicular to (across or against) the grain of the wood. Because the grain of plywood alternates between layers, we define cross cuts as going along the width of the material, regardless of the orientation of the surface grain.
FENCE. A stationary reference from which stock is indexed and worked. When making a ripping cut, use of an adjustable ripping fence ensures that the cut is square and parallel.
MITER GAUGE. An adjustable, angular fence used to guide stock across the blade. This tool is useful when making a cross cut or an angled cut.
STOPS. An adjustable fixture attached to the fence which enables a cut of a particular length or width to be repeated accurately.
KICKBACK. When stock passed improperly through a machine is thrown out of control by the cutting blade. A kickback implies extreme danger to the operator of the machine.
KERF. The part that goes away; the width of the blade.
GENERAL GUIDELINES
The following guidelines apply for all hand tools. Select the most appropriate tool for the job. (Don't use a box cutter as a screwdriver.)
- Secure your work to a workbench before using hand tools
- Handle tools with care when moving about the Shop.
- Lay tools in a safe place. Do not leave tools projecting from a workbench or vise. Hand off tools with the handle extended. Never throw tools.
- Keep tools clean. Do not allow oil, grease or dirt to accumulate on the tools or their handles.
SHARP-EDGED TOOLS
 Sharp-edged tools include saws, chisels, awls, knives, and scrapers. Keep the following in mind when using a sharp-edged tool. Only hold a sharp-edged tool by its handle. A dull tool is dangerous because it is difficult to control. Always keep sharp-edged tools sharpened.
- Always cut away from the body. Never expose yourself or others to the cutting edge.
- Do not stand in front of anyone else using a sharp-edged tool.
- Carry sharp-edged tools by the handle with the point downward. It would be bad to place a sharp-edged tool in your pocket.
- Be careful when sharpening tools, and keep fingers away from the cutting edge.
HAND SAWS
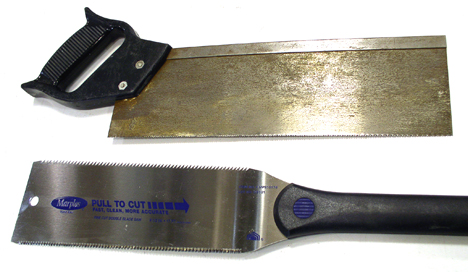 There are two types of hand saws. Pull saws have teeth that face toward the operator and cut on the pull stroke. These saws have thin curfs and provide a great deal of control. Traditional saws have teeth that face away from the operator and cut on the push stroke. These saws generally have thicker blades and are used for cutting larger material.
- Make sure the material you are cutting is stable before you start cutting.
- Check that the path of the blade does not pass through anything valuable on the underside of the cut.
- When first beginning a cut, score the material lightly with the blade.
- Be sure you can still control the material once it falls into two pieces.
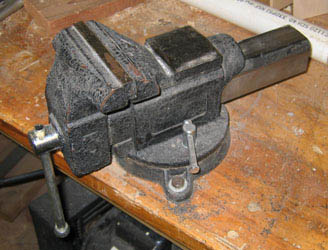
CLAMPS AND VISES
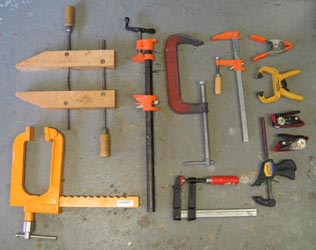 Clamps and vices are used to secure materials to a stationary work surface. Clamps are usually regarded as portable devices, while vices are generally attached to work benches and are stationary. Do not leave tools or materials projecting out from vices.
 We use clamps to secure materials while working and provide additional safety and control. Clamps are highly recommended to secure materials when using a drill press, hand tools, or portable power tools. Clamps may also be used to join and glue objects together. Several types of clamps are available in the shop, including traditional wood clamps, small hand clamps, web clamps, a variety of C clamps, a few "quick-grip" clamps, and a large supply of pipe clamps.
Use care when removing clamps from the storage rack (because you could inadvertently trigger an avalanche). When a vise is not in use, close the jaws and leave the vise handle hanging vertically.
GENERAL GUIDELINES
The following guidelines apply for all portable power tools. Be sure your hands are not wet when using electric power tools.
Be sure any electrical cords are out of the way.
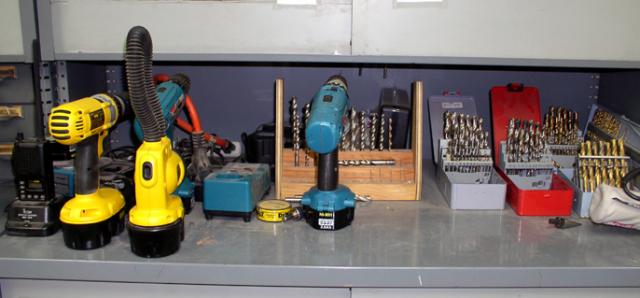
ELECTRIC HAND DRILL
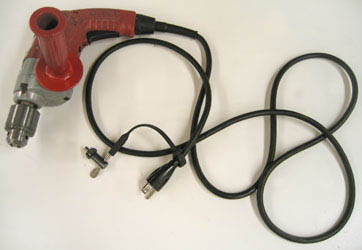
Electric hand drills are extremely useful in that they may be used to drill, screw, grind, polish, and sand given the proper attachments. Corded hand drills are used when you need a lot of power. Cordless hand drills provide mobility and convenience. The shop also has hammer drills for working with masonary concrete and brick. Hand drills are not recommended for working metal. Be sure the drill is unplugged before tightening the chuck.
Be sure the drill switch is off before plugging it in to the outlet
- Always hold the switch when operating the drill. Be ready to stop the drill instantly.
- When using a heavy-duty drill, hold the drill with both hands and brace the body well to avoid injury.
- When using hand drills, the drill is more volatile when it exits the material than when it enters the material. (If you use a large drill bit, as it exits the backside of the work the bit will become unstable and the drill will wrench your wrist.)
- It is recommended to place a backing board under the material you are working on so that the drill bit will not blow out as it exits the back of the material.
- Always hold the switch when operating the drill. Be ready to stop the drill instantly.
- When using a heavy-duty drill, hold the drill with both hands and brace the body well to avoid injury.
When using hand drills, the drill is more volatile when it exits the material than when it enters the material . (If you use a large drill bit, as it exits the backside of the work the bit will become unstable and the drill will wrench your wrist.)
It is recommended to place a backing board under the material you are working on so that the drill bit will not blow out as it exits the back of the material.
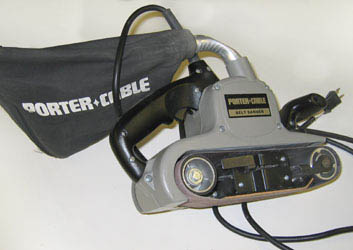
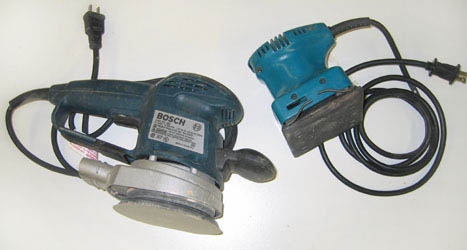
ELECTRIC SANDERS
Electric Sanders come in many sizes and shapes, including special use application sanders.
Belt Sanders are for quick stock removal.
Random Orbit Sanders use round sand paper and are useful in sanding flat surfaces.
Pad Sanders use a quarter sheet of sand paper and are useful for curved and flat shapes.
- Clamp or rest the stock to be sanded firmly against the work surface.
- Unplug the tool before changing the sandpaper.
- Keep both hands on the handle. Always keep your hands away from the sanding surface.
- Use the belt sander only on pieces of stock of sufficient size to be sanded safely. Clamping is recommended.
- Do not overload the motor by pushing down. Allow the weight of the tool to provide the working pressure.
SKILL SAW (Circular Saw)
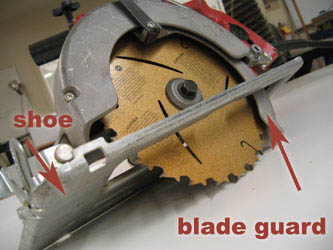
Skill saws, or portable circular saws are used as portable table saws. They are extremely versatile once you know how to use them. Entire houses are built with this tool alone. (Hence the name "Skill".) Make sure the blade on the saw is intended for the material being cut.
- Check that the shoe and blade guard are in good working order. Never remove or disarm the blade guard.
- The shoe can be raised or lowered relative tot he blade to adjust for depth of cut. Adjust the blade so that it will not extend more than 1/8" through the material to be cut.
- Properly support the material to be cut. Never hold material in place with your feet or knees.
- Never lift the guard by hand when the saw is in operation.
- Make one cut at a time. After making a cut, leave the saw blade in the cut until it stops.
- Never pull the running saw backward in a cut, as this will cause it to kickback (a great technique for thumb removal).
- Always set the saw down on its side with the guard closed.
- Never a hold a running saw at your side.
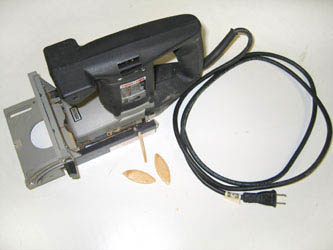
PORTABLE JIGSAW (Saber Jaw)
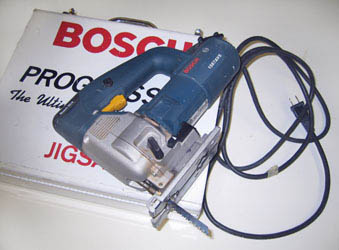
The portable jigsaw uses a reciprocating blade in an up-and-down motion. This is the portable version of a band saw. It can be used to cut scrolling or curved cuts in materials up to 2 1/2 inches thick and can cut straight lines given practice or a portable fence to run against. The blade can also be plunged (through a pre-drilled hole) into the center of a board to safely create pockets, unlike the skill saw. Hold the saw firmly against the stock to be cut and keep hands and body clear of the saw blade.
If the blade breaks, binds or bends, turn the saw off immediately.
- Guide the saw carefully so that blade does not cut into the surface supporting the material.
- Do not use the saw to cut small pieces of stock.
- Do not force the cutting action; a blade will break if forced to cut too fast.
- The width of the blade limits the radius of the cut you can make. It is often necessary to make "relief cuts" which remove excess material and provide enough room for the blade to make a tight radius cut.
- Never lift the jigsaw out of the work while the blade is moving. This will mar the material and break the blade.
- Install blades with the teeth pointing forward.
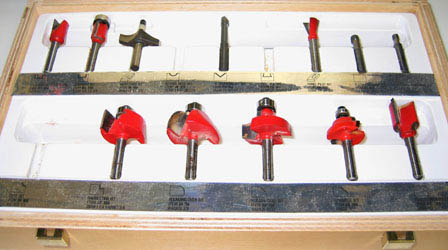
PORTABLE ROUTER
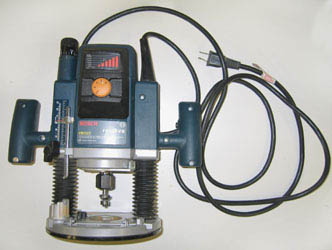
The portable router is a hand-held electric tool with a rotating bit that can be used to shape the edges and corners of wood. A plunge router can also cut pockets and details from the center of a work. Differently shaped bits can be used to achieve a variety of effects, making the router a highly versatile tool with countless applications.
Given enough time and creativity, this one tool can replace all the others in the shop. Always unplug the electrical cord before changing bits or cutters, or making any adjustments. Be sure that the motor switch is off before plugging it into the outlet.
- After a machine is set, verify all adjustments, before turning on the power. Use a piece of scrap to test your cut before use on the actual work.
- Hold the router with both hands and feed the cutter slowly into the material. The direction of the feed must be opposite to the rotation of the cutters, or control cannot be maintained.
- Turn off the power and rest the machine on it's side, when a cut has been completed.
- In a plunge cut, the depth of the cut should not exceed 1/4" per pass in hardwoods.
BISCUIT JOINTER
The modern equivalent of dowel joinery, the biscuit jointer creates a half-football-shaped pocket in the edge of a board, allowing it to be mated to an opposing board possessing a similar pocket using a football-shaped wafer of compressed particle board. When glued into place, the wafer expands and creates a blind internal joint, much as a dowel would. This technique is useful for insuring that the top surfaces of two joined boards will remain level as clamps are applied.
Machine tools are designed to be versatile, and each machine is capable of performing a variety of tasks. As a result, many of the stationary tools described here have overlapping functions. While there may be several tools capable of performing a specific task, some may do so more accurately or more safely than others. Therefore we require that certain cuts be made using only specific machines.
GENERAL GUIDELINES
The following guidelines apply to all stationary machines in the shop:
- Keep the area around any machine you are operating clear of debris and unnecessary tools and materials.
- Secure and tighten all guards, fences, or other attachments before turning on the power of any machine. Any adjustments, oiling, or cleaning of machinery must be done while the machine is unplugged. Never remove guards or safety devices from any machine.
- You must use a fence when using a stationary machine. Working without a fence is dangerous. Working with two fences can cause the work to bind between the fences and result in a kickback.
- Carefully plan your course of action before turning on the machine you are operating. Stay with the machine you are operating until the work is clear and the blade is stopped. Do not walk away from a machine that is still running.
- Only the machine's operator is permitted within the defined safety zone of any machine. Do not crowd or distract the operator of any machine.
- Be attentive to the machine you are operating and aware of your surroundings at all times. Always know the location of your hands in relation to the cutting blade.
- Never stand in line with the "throw" of any machine. If a saw breaks, if a machine becomes overloaded, if the stock is not held securely, or if a knot or large sliver becomes loose, these objects may be thrown out with terrific force.
DRILL PRESS
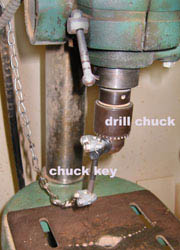
The drill press may be used on wood and plastic, and with the correct bit may be used on thin metals. Thicker metals cannot be drilled with a drill press, and require a vertical end mill. Always use a sharp drill bit which has been ground properly for the material to be cut.
- Be sure the drill bit is centered in the chuck and tighten it securely using the chuck key. Chuck the drill bit on the solid shank, not on the cutting spirals. Remember to remove the chuck key.
- Always secure the work to be drilled to the table. Small pieces require the use of a drill vise. Larger work needs to be clamped to the drill table.
- Back the work with a piece of wood to prevent the drill from blowing out the material as it exits. Always use a backing board when drilling sheet metal.
- Do not drill into the drill table base.
- Set the appropriate drill speed for the size and type of drill bit and hardness of material to be drilled. Harder materials will require slower drilling. When using large bits, such as a fly cutter, set the drill press at a slower speed.
- Do not use excessive feed pressure when drilling. Too much pressure can cause the drill bit to catch in the work or cause the drill bit to break.
- Stop the machine immediately if the drill bit catches in the work and causes it to revolve.
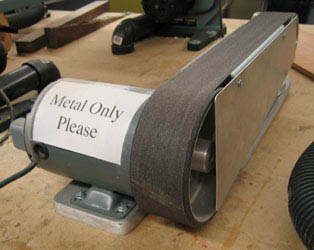
GRINDER/BUFFER
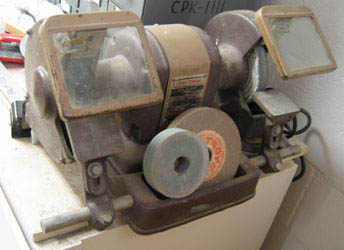
The grinder/buffer is mainly used to sharpen tools and do light machine work.
Be sure that the tool rest is 1/8" away from the wheel and properly tightened. If a wide space is left between the wheel and tool, the work will be caught and launched.

Do not grind against the side of the wheel. It may cause the wheel to break.
Stand to one side when starting the grinder, in case the wheel breaks.
This is important information, however you will most likely be using the abrasive belt metal grinder for metalworking, because it allows a more sculptural approach.
JOINTER
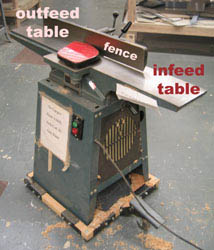
The jointer is where woodworking usually begins. This machine is designed with rotating knives that shave thin layers of material from the edges (or faces) of rough or warped lumber. The outfeed table is fixed, and aligned with the apex of rotation of the blades. The infeed table is adjustable and is lowered so that stock passing over the jointer is removed at the level of the outfeed table by the blades. The jointer is the only machine in the shop designed to create a true straight edge. Do not joint pieces that are less than 12 inches in length or less than 1.5 inch tall.
- Do not joint used material (there may be nails) or material with loose knots.
- Always joint with the grain, never across the grain.
- Never joint the end-grain, the wood will shatter and splinter, and the operator will get hurt.
- Limit the depth of cuts to 1/16" or less. Heavier cuts cause kickback and poor results.
- Push the stock past the knives and allow the guard to cover the knives before you pick up the stock.
- Use a push-stick whenever possible, particularly for small pieces.
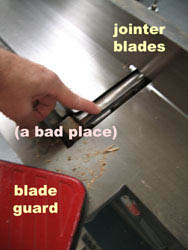
- Keep your hands away from the blade region of the jointer. As the piece advances across the cutter, raise the forward hand and place it on the piece ahead of the cutter. Follow the rear end of the piece with a push-stick.
- While jointing, keep an even pressure against the fence with the left hand. Keep your hand on top of the board to stay clear of the blades. Exert light downward pressure with the push-stick and glide the work across the jointer, letting the jointer do the work.
- Keep the blade guard over the knives at all times when machine is running.
- Make fence adjustments only with the jointer stopped.
- Keep hands away from the blade region of the jointer at all times.
PLANER
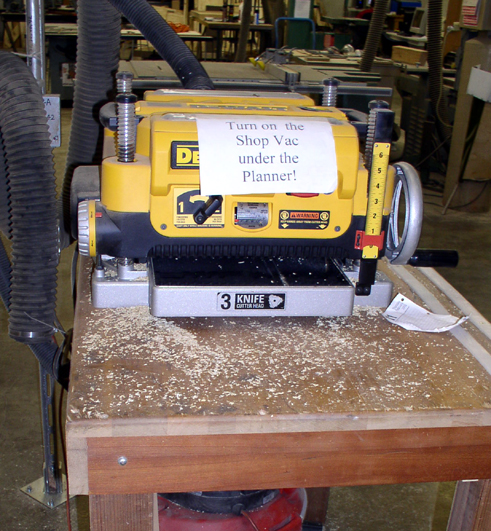
The planer is a machine with rotating knives that shave small thickness of material from the top (upward facing) surface of stock. Planers are used to clean rough lumber, re-dimension material, or to make surfaces smooth and parallel , unlike a jointer. Begin planing wood with the concave side down, and flip the board each time you run it through the planer to remove warps and defects. This tool does not automatically activate the dust collector, and you will need to switch on it's dust collector directly. Always use the planer to surface with the grain, never across it.
Our planer can plane surfaces up to 13 inches wide.
- Do not attempt to surface lumber that is less than 12 inches long and 1/4" thick.
- Lower the blades 1/32" (or one-half turn clockwise) with each pass.
- Check material carefully for loose knots, dirt, splits, cracks and metal fasteners before planing.
- Be sure the planer is unplugged before you clean off shavings or chips.
- Support long boards as they are fed through the machine and always check that there is sufficient clearance to the wall.
- Keep the feed rate of the material through the machine constant. This may require pushing on the infeed and pulling on the outfeed of the machine.
- The wider the stock, the larger the surface area, the more difficult for the machine to surface the stock. Compensate by surfacing less per pass with wider stock to reduce the load on the machine.
- Keep hands away from the feed rollers and from stock already gripped by the feed rollers. Do not allow your fingers to be pinched between the underside of the board and the planer table.
SANDERS
Disc, belt, and spindle sanders are motor driven sanders on stationary platforms used to smooth material before sanding by hand for finer finishes. Perform all adjustments before starting the sander.
- Move your stock around on stationary sanders while operating, if you leave stock in one place for prolonged periods, it will leave burn marks.
- Use caution when sanding small objects, as they may slip and cause your fingers to come in contact with the sanding surface.
- Do not press stock to hard against the sander, as it could cause a kickback.
Belt Sander
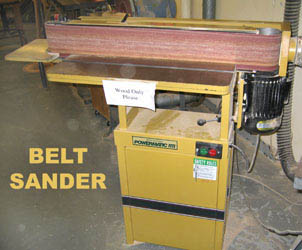
A belt sander has a large sandpaper belt that sands as stock is pressed against it. Belt sanders are called "edge" sanders when mounted at 90 degrees with the bed of the machine. Belt sanders are safe and effective for making straight or curved surfaces in wood. Before operating a belt sander, check to be sure the sanding belt is not ripped or torn, and if it is notify the shop supervisor.
Spindle Sander
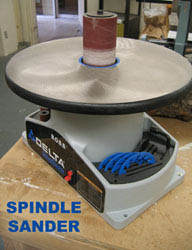
The spindle sander is used to sand inside pockets and curved edges. It provides a good 90 degree finished edge.
Disk Sander
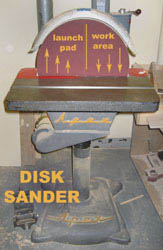
A disk sander has a large rotating sandpaper disk mounted perpendicular to a table. The disk usually spins clockwise, so that the left half of the disk travels upward and the right half of the disk travels downward. Only the portion of the disk traveling downward toward the table surface is used for sanding. Attempting to sand material on the upward-traveling half of the disk will cause it to be thrown out of control. The bed of this machine can be tilted up to a 45 degree angle to accommodate sanding angles.
The crepe eraser is used to clean the sanding surfaces of all stationary sanders in the shop. Its use is encouraged to improve sanding results.
BANDSAWS
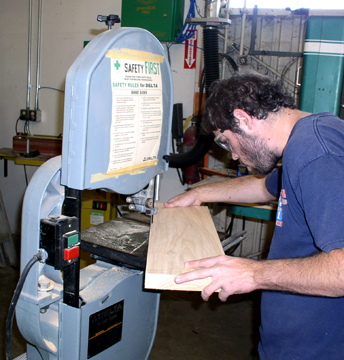
The bandsaw is ideal for most model making purposes and is fairly safe for smaller, more intricate work. This machine is also used to resaw thick lumber into thinner pieces and for advanced techniques such as "book matching" of woods. The blade on the bandsaw is a continuous band, and can produce straight or curved cuts. Angled cuts can be achieved by tilting the machine's table base. There are three sizes of bandsaw available in the shop, and it is important to select the correct size of bandsaw for the size of the work.
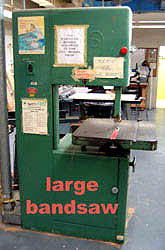
The large 120-inch band saw is usually fitted with a 1" wide resaw blade and is used for making straight cuts.
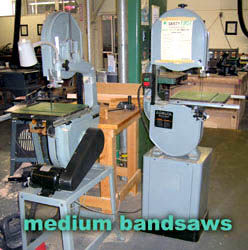
The smaller bandsaws usually have 1/8" to 1/4" blades which can cut tighter radiuses.
- Only wood, plywood, or masonite may be cut on the bandsaw. Do not cut metal on model shop bandsaws. There is one bandsaw in the shop that is also plastic compliant.
- Make adjustments to the bandsaw only when the machine is completely stopped.
- Bandsaw guides should be adjusted to approximately 1/8" above the stock to be cut.
- Obtain the shop supervisor's permission to saw any material that does not lie flat on the table. Use a clamp or jig on uneven material.
- Make side or relief cuts through the scrap side of your work to avoid backing out of a long cut, or cutting too tight of a radius.
- Stop the band saw completely if it is necessary to back out of a long cut.
- Make side or relief cuts while sawing small radius curves.
- Do not twist or bind the blade, as it will break and may harm you.
- Do not cut cylindrical stock without a holding device.
- Be sure that your work is vertically supported. Because the bandsaw blade travels downward toward the table, if the leading edge of your work is cantilevered forward, the blade will force the work downward violently and cause you to lose control.
TABLE SAW
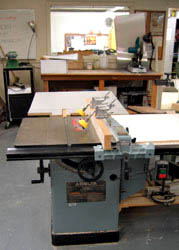
The table saw is a circular saw attached to a table which cuts from beneath the table top. This machine is highly versatile, but it is mainly used to to produce parallel straight cuts in plywood and cut larger lumber down to workable sizes. The blade can also be angled to make bevels, chamfers, and other complex cuts. With very few exceptions, we do not use the table saw to make crosscuts in this shop. Crosscuts can be made more safely using the radial arm saw or the panel saw. In our model shop, nobody operates the table saw alone. The operator must be assisted by a spotter. The spotter's function is to help hold the material against the fence, hold down the material as it passes through the blade, and insure the material on the outfeed table gets past the blade every time. (And if anything goes wrong, to run around screaming like a decapitated chicken after turning off the saw, of course).
The table saw is not to be used as a workbench or eating table. Any objects left on the saw are potentially dangerous. Be certain that the saw table is clear of any tools or material except the stock to be cut.
Setup:
- You must use a spotter, hold-downs, and a push-stick when operating a table saw.
- Before starting the machine, see that the blade is securely fastened to the arbor, that it revolves freely, and that the screws or clamps on the fence are tightened. Be sure that the fence is sound and locks down securely. Failure to check these points could cause the wood to be thrown back at you.
- Raise the saw approximately 1/4" above the stock to be cut. The least amount of blade above the work is safest.
- Set the fence hold-downs so that the front hold down is just to the left of the blade, and the back hold down is closer to the fence. Make certain there is adequate downward pressure on the material from the hold down.
Controlling Material:
The material between the fence and the blade needs to be controlled at all times. Have a push stick accessible, and plan the best path for its use between hold-downs, the fence, and the blade. Use the push stick to provide diagonal pressure against the table saw fence. Controlling the off-cut is a secondary concern.
PushSticks:
- Keep your fingers clear of the path of the blade. Do not allow your hands to cross in front of the blade or to pass beyond the blade towards the outfeed table while the machine is in operation.
- Be sure the edge of the board that is against the fence is straight. (If it is not, run the board over the jointer.) Curved material will bind if passed between the blade and the fence, generating a kickback which will hurt the operator :-(
- Always use a push-stick when ripping stock. A push-stick is narrower than a hand and will keep the operator's hands a safe distance from the blade.
- When ripping long stock, have the spotter assist in supporting the material. The spotter should support the stock, but should not pull on the material unless directed to do so by the operator.
- The operator should stand to one side of the saw, out of the path that the material will take in the event of a kickback. Do not allow anyone else to stand in line with the throw of the saw.
- Do not attempt to stop a coasting blade by holding wood against the side.
- Never lower work onto a moving blade. Blind cuts are not allowed on the table saw.
- Exercise great care when using the table saw blade in a tilted or angled position. There is greater risk of the material binding between the saw blade and the fence when making an angled cut.
- If you are unsure about making a cut, consult the shop supervisor (that's what he's there for).
TABLE SAW MITER GAUGE

The miter gauge provides the only safe method of making a crosscut on a table saw. Exercise care while crosscutting.
Do not crosscut stock that does not rest firmly along the miter gauge.
When making a crosscut, be sure that enough of the material is supported by the miter gauge so that the saw blade does not have enough leverage to bind and throw the material.
Never release control of the material until it is completely clear of the saw blade. Do not attempt to cut material that does not lie flat on the table.
CROSS CUTTING
At the ENV Model Shop, tablesaws are used for rip cuts; however, there are safer methods for cross cutting.
RADIAL ARM SAW (Crosscut Saw)
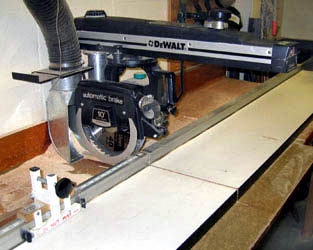
The radial arm saw has a circular saw blade attached to a stationary stand. Its main function is to cut long pieces of lumber down to more manageable sizes. This saw produces a 90 degree cut. Though the radial arm saw is capable of making rip cuts, it is not recommended. In the model shop we use this machine for crosscutting only. Check all adjustments and locks before operating the machine. The blade should be positioned just below the top of the table.
- Hold the material firmly against the fence. Do not move the material until the saw is back and completely clear of the work.
- Hold the saw handle firmly and pull slowly to prevent the saw from "jumping" or feeding into the wood. On thicker or harder material, the blade will try to run toward you. You must control the saw and move it slowly through the material.
- Cut only one piece of material at a time. After each cut, remove any scraps from the track of the saw.
- Do not cut material shorter than 1" with the radial arm saw. When cutting shorter material, use a long piece of scrap (rather than your hand) to hold the material against the fence.
- Use extra care when cutting warped, twisted or crooked stock. For bowed lumber, face the crown toward the fence and the table surface to prevent binding the blade. In other words, be sure the part of the board to be cut is supported by the fence.
PANEL SAW
The panel saw excels at crosscutting large material, including plywood. It is an extremely safe saw to use although indexing is primitive. The operator must place a mark on the material to be cut and line the mark up with the blade of the saw as there are no accurately metered fence stops for this tool.
MITER SAW (Chop Saw)
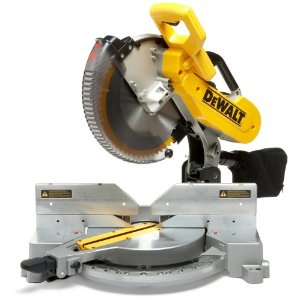
The miter saw is used for making precision angled cuts. The blade can be positioned from 90 degrees to 45 degrees in either direction for mitered cuts. The machine cuts by dropping the blade downward into the material in a chopping motion. This tool is useful for making mitered corners in small boxes, model wall sections or architectural moldings. Be sure that the ends of the material are properly supported.
Keep hands clear of the blade.
Wait for the blade to stop moving before raising the handle after making a cut. Raising the blade while the machine is running will damage the work.
SCROLL SAW
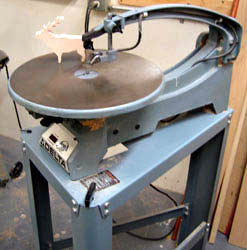
The scroll saw is used to make detail cuts on small work. The machine's base is adjustable so that wood can be cut at an angle. The blade is attached to an overhead arm that moves up and down, similar to the motion of a sewing machine. When fitted with the right blade, this tool can cut in any direction and can be used to cut pockets inside of thin material. Select the appropriate blade for the material to be cut.
- Use a sharp blade to improve the quality of the work and reduce the risk of breakage.
- Install the blade with the teeth pointing downward. (To change the blade, raise the tension arm and insert the allen wrench before loosening the holding nut. Be sure the blade is back against the holding screw before tightening.)
- Adjustments should be made only when the machine is stopped.
- Check all tension adjustments and be sure that all set screws are tight.
- For most applications, set the saw for 1000 cpm (cuts per minute).
- Adjust the pressure foot to rest on top of material to be cut.
- Plastics and harder materials are cut at slower speeds.
- Push the work gently against the saw blade, do not force the cutting action.
- Hold stock firmly against the table and keep fingers away from the front of the blade.
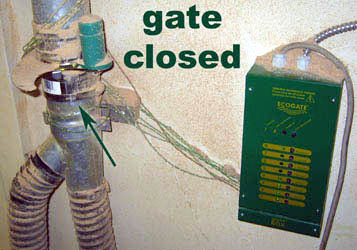
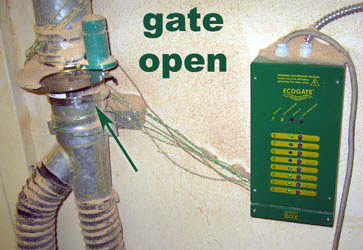
DUST EXTRACTION
The ENV Model Shop is equipped with a state-of-the-art dust collection system that is computer controlled and functions automatically. When you turn on a stationary tool the dust collector should turn on (if it is not already) and the dust gate to the machine you are using should move to the open position (if it is not already). If you experience excessive dust at your workstation know to look and insure the system is functioning correctly.