Pricing & Other Services
Other Services
CNC (Computer Numerical Control) Machine for 2D and 3D milling of wood and foam:
2D Cuts (profile, pocket, drilling, engraving) at $ 1.00 per minute.
3D Cuts (roughing, finishing)) at $ 0.70 per minute.
Laser Cutter Self serve service at $ 0.70 per minute. Materials: cardboard, museum board, chip board and basswood and acrylic.
Materials
There are materials available for purchase at below-market value, including plywood and other various woods.
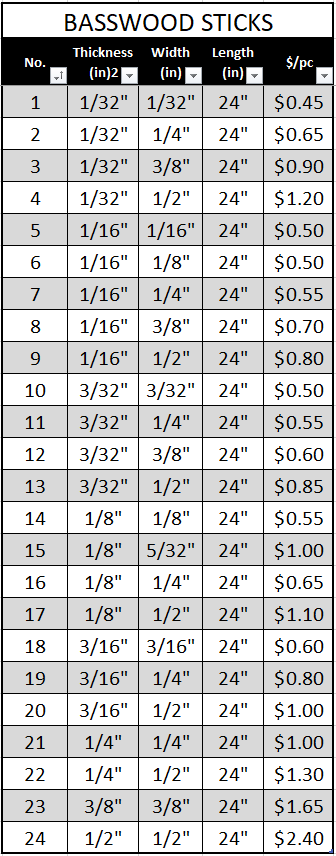
Basswood Sticks for sale while supplies last.
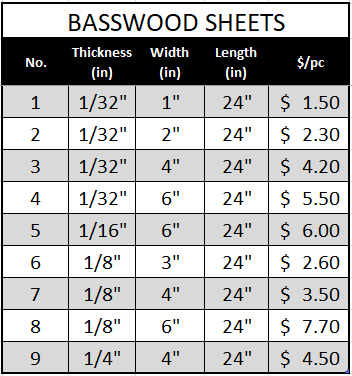
Basswood Sheets for sale while supplies last!
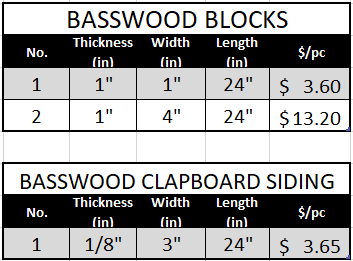
Basswood Blocks and Clapboard Siding sale while supplies last!
Safety Equipment
Safety equipment is available for purchase, including safety glasses, earplugs, and dust masks.
Tools
Hand tools and portable power tools are available for overnight checkout. A late fee of $2 per handtool and $5 for power tools will be applicable if the tools are not returned within 24 hours of checkout.
Note: In crunch times, a sign-up sheet is posted in the Model Shop. The cost of using the laser is $0.90 per minute.
CO2 LASER
The Model Shop's CO2 laser operates in three distinct modes:
- Etching: Where the laser beam rasters, traversing left and right as it slowly steps vertically through the entire image area.
- Scribing: Where the laser beam follows the direct path of a vector graphic.
- Cutting: Where the laser beam follows the direct path of a vector graphic with enough power to cut completely through the material.
Color determines the mode of laser operation.
- Shades of black, including grays or grayscale objects will be etched.
- Blue colored objects set to a hairline thickness (0.000 or hairline) will scribe.
- Red colored or outlined objects set to a hairline thickness (or 0.0000) will cut.
Etching takes considerably more time than scribing or cutting as the laser will raster the entire canvas instead of moving directly upon the vector‘s path. Use the above color code when creating artwork. If the schemata is correctly followed, including line weights, it is possible to laser etch, scribe and cut from a single flattened image. However, it is highly recommended that each color occupy a separate layer in your graphics program for ease of operation if corrections need be made. We may run the laser directly from the following programs:
AutoCAD 2002 (hairline = 0.00)
Adobe Illustrator CS3 (hairline = 0.0001)
RGB R= 255 G=0 B=0 to cut
RGB R= 0 G=0 B=255 to scribe
PHOTOSHOP FOR ETCHING
Programs have variations in defining hairline; for all programs the vector line must be red to cut.
In Operation: Begin with a canvas size of 16” x 12” in landscape format. All artwork must be placed within this canvas; a small amount of border, 1/4” is reasonable.
In most graphics programs you may specify the canvas size and the artwork may then be rendered directly upon the canvas. In CAD it is recommended that the canvas be drawn in a separate layer other than black, blue or red, and that the 16” x 12” rectangle may be on a layer that is not illuminated when printing, i.e. sending to the laser, as the laser will try to etch any layer that is set to print.
The laser regards “Home” or X=0 and Y=0 as oriented in the upper left corner of the canvas. From the Home position the machine measures in inches to the right up to 16” and down to a maximum of 12”. In practice, if you wanted to engrave an image that was only three inches square, the material would be placed against the top left of the laser bed, and the laser will know to send the 3” x 3” image to that location.
If for example your material to be cut is only 8” x 8” simply orient your artwork in the top left corner of a 16” x 12” canvas.
Etching may be done on glass, plexiglas (low polycarbonate such as acrylic) wood, anodized aluminum, treated tile (lasertile.com), and specialized marble. Harder metals including stainless steel may be engraved by first painting the surface with Cermark (additional cost per square inch) whereby a black pigment is permanently bonded to the metal. Cermark will not work on aluminum or softer metals.
The laser is capable of cutting up to 1/4” thick basswood and 3/16” baltic birch. Wood needs to be cut in a single pass because if it is not cut through the first time, the resulting char of carbon and resin renders the laser incapable of penetrating cleanly. ¼” plexiglas can also be cut on the laser, acrylic is best, high polycarbonate plastic such as Lexan do not cut well.
Vector graphics are derived from mathematical formulas and for this reason can be scaled without difficulty. Bitmaps are not as easily scalable as their quality is determined by the resolution they were created with. Bitmap images (digital photos) may be etched by the laser. The laser has a resolution of 250 DPI for most materials. Some softer or more flammable materials will produce a better image utilizing 150 DPI.
When working with a Bitmap image, the image must be converted to grayscale. The greater the contrast the better, and an image with a lot of grey in the background will not generate great results. Consider processing the image to show what you desire to feature, sometimes it is best to delete the background entirely in Photoshop. It is recommended that when importing an image that it is imported as a Tiff.
From Photoshop various Halftone Screens are applied, depending on the material being etched. For example, in wood a frequency of 60, an angle of 45, and a square may be applied, while acrylic will use a frequency of 90, an angle of 45 and a square.
The laser works by amplifying a very specific frequency of light and focusing it on an extremely small focal point. For this reason it works best on flat surfaces. On a round object the focal point will be compromised, and a distortion of the image will occur, as artwork will become elongated about a radius. “Squishing” your artwork at the polar extremes may compensate for the elongation effect. A rule of thumb for etching a small dowel (pencil), for example, is that the artwork or lettering should never exceed 1/2 the diameter of the object. Obviously there are diminishing returns on larger diameter objects.
The ENV shop offers limited metal fabrication facilities. Our program allows an introduction to welding, covering the basics. For state certification in welding there are other programs through the College of Engineering or at Mt. San Antonio College.
Due to limited resources our forays into welding are conducted on a one to one basis with ENV Shop technicians, which should be scheduled in advance during peak times of the year. Before inquiring further within the ENV Model Shop, students should first be aware of the Four G’s employed for safety: goggles, gloves, gown and ground.
Much of the safety procedures described in other sections of this publication are transferable and applicable to this media, with particular emphasis on closed toe shoes, and media specific eye and hand protection.
Tools available to assist with projects include:
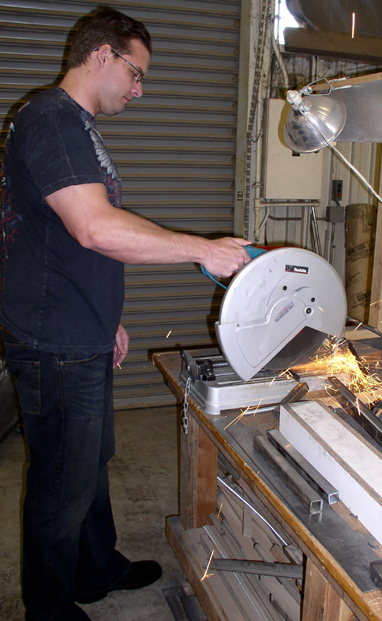
ABRASIVE MITER SAW
Hand-held angle grinders for cutting, and sanding.
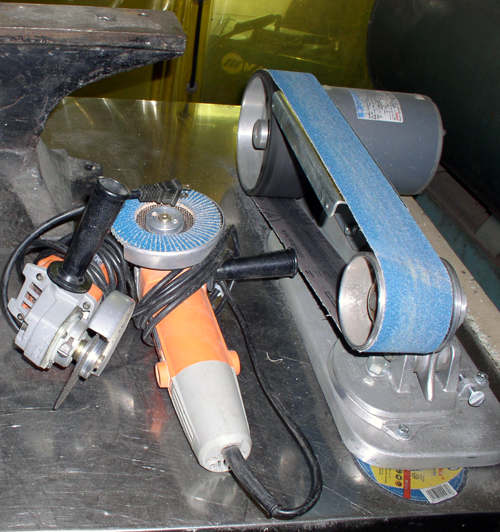
A medium-size belt sander made for metal fabrication with a flat plate, as well as curved surfaces.
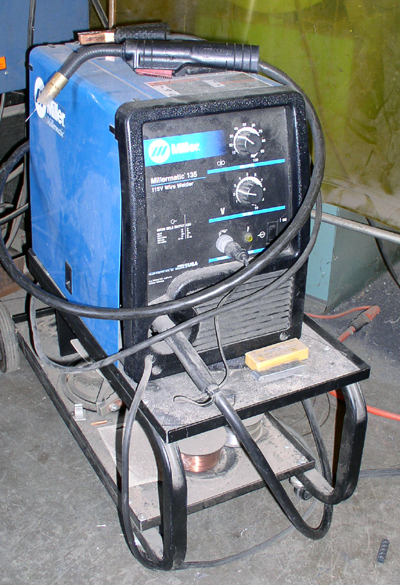
A mig (wire feed) welder.